Main Content
A Blurring Effect
There is a video version of this tutorial available
Welcome back to Foundation Flash tutorials. In the next of our amazing free tutorials we come accross the blur filter. Using no code whatsoever we shall be creating this:
We start with a blank stage. Obviously, then add some text to the stage that you want to blur. Once you have your text, press F8 to convert it to a Movie Clip symbol. This will make it nice and easy to apply a filter. A filter is an effect - a drop shadow, bevelling, a glow, or something like that.
Add a new keyframe later on on the timeline, and click on it to make sure you're editing the text there - or if you wanting it to become clearer, click on the first keyframe. When you are editing the keyframe that you want to be blurred, whether it be at the beginning or end, click on the text.
Next, select "Filters" on the tabbed section at the bottom, or wherever you have moved it to. Press the cross that means "Add new filter", which is ringed in this picture:
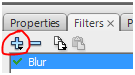
Then press "blur" to add a new blur. Make it stronger by turning the quality up and making the numbers a bit bigger. 25 should do the trick. All that is left now is to right click between the keyframes and press "Add Motion Tween". Just press CTRL/Command and Enter to watch!
Simple but effective. Plus you now know how to apply and tween a blur effect.Well done and thank you for reading,
Harry