Main Content
Point and Click Games
Adapted from , written and contributed to Foundation Flash by Rose.
Point and click games are probably the simplest, but potentially most powerful, games that can be made using Flash. While it uses (relatively) simple code, quality of gameplay inside a point and click game depends solely on the game developer's creativity. Some point and click games focus on puzzles, some on 'pixelsearching', some on weird 'get items to make things', some on graphicalart, and some others on adventure plotlines. This tutorial is about how to make one of your very own using Adobe Flash CS3 (or 4, though you may find some sections a little different from you have in front of you) - i.e. a version with ActionScript 3.0). The example FLA file is included.
First, create a new Flash ActionScript 3.0 file - this tutorial won't work for previous file version of ActionScript, sorry. Secondly, make enough keyframes on the timeline - one for each of the rooms you want to make. This can be done in the usual way by right-clicking on the timeline.
To make sure that Flash does not automatically flick between rooms, you need to type stop(); inside the actions panel (F9 to access) for each of the frames.

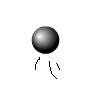
Next, populate your rooms with objects, both background and clickable items. You could do this by either dragging an image file to the stage or drawing them using Flash features.
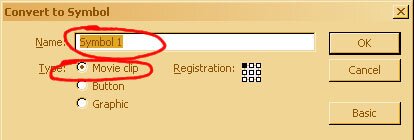
Click each object you want the player able to interact with (including arrows to move around the rooms), and press F8 to bring the symbol properties dialogue box up. Select 'Movie clip' and name your symbol, before pressing OK. Note that the movie clip will appear in your library and you could re-use them.
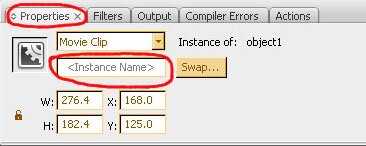
Click the object and look at its properties (notice that the properties have now changed to movie clip properties) and add an instance name. Remember this instance name.
Some basic commands we will use in the code for this tutorial: traces and comments.
Making the click interactions.
Click one of the timeline and press F9 to open the actions panel. Remember the instance names we had assign before for this timeline and put this code into each of them.
instancename.addEventListener(MouseEvent.CLICK,actionname);
function actionname(event:MouseEvent){
        trace("yougotactionhere");
}
By now, your objects are clickable, but we hasn't assign any actions to them. There are variety of actions you can use, depending on what you need the object for.
Adding descriptions to object
The most basic interaction met in point and click games are objects descriptions. First, at the stage, add a text box (press T), make sure the size fit your text, and assign it to the 'dynamic' text setting. If your descriptions are likely to be longer than one line, put on 'multiline'. Next, assign another instance name to it. Then, go to the actions panel(F9) and assign this code to your former function.
instancename.addEventListener(MouseEvent.CLICK,actionname);
function actionname(event:MouseEvent){
        textinstancename.text = "Hello world! Your description goes here.";
}
Draggable objects
Making objects draggable is a similar process to assigning click interactions but we this timeneed to make two eventlisteners and two functions for it. They are explained on the drag and drop tutorial.
drag1.addEventListener(MouseEvent.MOUSE_DOWN, mouseDownHandler);
drag1.addEventListener(MouseEvent.MOUSE_UP, mouseUpHandler);
function mouseDownHandler(evt:MouseEvent):void {
        var obj = evt.target;
        obj.startDrag();
}
function mouseUpHandler(evt:MouseEvent):void {
        var obj = evt.target;
        obj.stopDrag();
}
Making key-type objects
Next interaction commonly to point and click games are key items. These items allow us to open next area, other item, or proceed to next quest/event.For this, what we need is to make a boolean variable to hold the value.
First, declare the variable. It is recommended to declare this variable on a keyframe, so you and Flash can find it easily, rather than on an object.
var gotKey:Boolean = false;
Next, when the player clicks on the object's corresponding movie clip, change the variable to true using this script:
keyinstance.addEventListener(MouseEvent.CLICK,actionname);
function actionname(event:MouseEvent){
        gotKey = true;
}
Last, make an if function to check if the player has got the key (the ' == true' is optional):
doorinstance.addEventListener(MouseEvent.CLICK,dooraction);
                                function dooraction(event:MouseEvent){
        if (gotKey == true) {
                trace("openthedoor");
        }
}
Alternatively, if the player needs two or more key to open the door, you can add && to the code:
if (gotKey == true && gotKey2 == true) {
Or if player only can pass the door if they don't have the key:
if (gotKey != true) {
Or, in shortened form:
if (!gotKey) {
Moving between movie clips/rooms
In most point and click games, there is more than one room. For this,w e need to apply gotoAndStop or gotoAndPlay to move between rooms. The code below will move the movie to frame (i.e. room) 2 and stop there.
nextroominstance.addEventListener(MouseEvent.CLICK,nextroomaction);
function nextroomaction(event:MouseEvent){
        gotoAndStop(2);
}
If the player need a key to enter the room, combine the bits of code listed above by replacing the trace with gotoAndStop(timelinenumber);
While we could put frame number for these functions, it is recommended to use labels since labelling will prevent us from having to recode if we add more frames to the game. To do this, click on a keyframe, and put a frame label on its property tab. 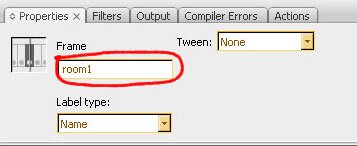
And change the code to gotoAndStop("framename");.
Moving or make objects disappear
If some items should disappear after the player clicks on them or maybe move to another place, you want this code. While there are many possible scripts to do these, this one is the perhaps the simplest (though not the most efficient for large projects):
function ifitemclicked(event:MouseEvent){
        item.x = -500;
        item.y = -500;
}
Accumulating items
Let's say that the player needs to collect 5 stars before they are able to proceed, you don't have to make 5 variables and check them all.
First, declare a number or uint variable. It is recommended to declare this variable on the main action script layer.
var stars:uint = 0;
Then inside a frame where the player supposed to get a star:
starinstance.addEventListener(MouseEvent.CLICK,gotstar);
function gotstar(event:MouseEvent){
        stars++;
        star1.x = -500;
}
Making mouse pointer change...
... to a hand. Right after your event listener, type the instance name and code:
instancename.buttonMode = true;
Making password check
Making a password check is a bit complicated in terms of the amount of code needed, though it still use almost the same functions. First, declare two variables in the main action script layer:
instancename.buttonMode = true;
Then inside the room frame, create one input text with instance nametext4, one dynamic text with instance name text5 to check if player put in the right numbers, and a button with an instance name of 'proceed' for the checking.
proceed.addEventListener(MouseEvent.CLICK,checkpassword);
proceed.buttonMode = true;
function checkpassword(event:MouseEvent){
        userinput = text4.text;
        if (userinput == thepassword) {
                text5.text = "You input the correct password!";
        }else {
                text5.text = "You input the wrong password!";
        }
}
You could also use if (userinput == "123456") to check the password, though this is not recommended for tidyness.
Well, I hope you have enjoyed this tutorial, adapted from , written and contributed to Foundation Flash by Rose. Want the FLA file?
Harry