Main Content
Moving to Mouse Project
A round up of the code used can be found here.
Welcome to Foundation Flash once again. In today's tutorial, I am going to teach you about the setInterval function, and I will teach you how to make this:
I'm going to start with a brief explanation of the setInterval function. It works in conjunction with a custom function, and is constructed like this:
Intervalname = setInterval(Functionname, Intervaltime)
What it does is carry out a function every "x" number of milliseconds. In case you don't know, that is a thousandth of a second. So, say I had a functioncalled "dosomething", and I wanted that function to be carried out every 5 seconds. How would I do that? With a setInterval. So, I'll call my interval "howLong", and assign it that function and time:
howLong = setInterval(dosomething(), 5000)
Easy, eh? So, lets put it into action by making our little mouse following warpy thing. First, make sure to set your fps to 30 in the properties panel. Then, draw a small blue circle about 30 x 30. Press F8 to convert it to a Movie Clip, and call it "ball". That's it. Now we only have to code it. Select the first frame in your movie and press F9 to open its actions panel. Inside, type:
var i = 1
function duplication(){
        duplicateMovieClip(_root.ball,"ball"+i,_root.getNextHighestDepth())
        i++
}
blah = setInterval(duplication, 10);
What we just did was to first set a variable called "i", and then to set a custom function called "duplication", which duplicated our "Ball" Movie Clip and increased the "i" variable by one. You should be familiar with this code from our previous tutorials, but then is the new bit. We then set an interval called "blah", which carries out the "duplication" function every 10 milliseconds. But now we have to carry out the movement code. Select the ball Movie Clip on stage, and press F9 to open up its action panel. Inside, type:
onClipEvent (load) {
        this._x = random(550);
        this._y = random(400);
        this._alpha = random(100);
        this._xscale = random(100)-50;
        this._yscale = this._xscale;
        var timeon = 0;
}
Now, the only things there that I think you might be unfamiliar with are the _alpha, _xscale and _yscale properties. What they are respectively are the alpha(transparency) value of the current Movie Clip (measured in percentage), the scaling of the x size (also in percentage), and the scaling of the y size (in percentage). So, this code creates the randomisation effects when the Movie Clips are first loaded. It controls their position, their size and their transparency. What it does is set the Movie Clip's x and y co-ordinates to a random position on the stage, then makes the alpha value of the Movie Clip random, and also the x and y sizes random, ensuring that the y size is equal to the x size, meaning a completely perfect circle. It then creates a variable called timeon which we will use in a moment.
After all that code, type:
onClipEvent (enterFrame) {
        var yEnd = _root._ymouse;
        var xEnd = _root._xmouse;
        this._x += (xEnd-this._x)/3;
        this._y += (yEnd-this._y)/3;
        timeon++;
        if (timeon == 7) {
                this.removeMovieClip();
        }
}
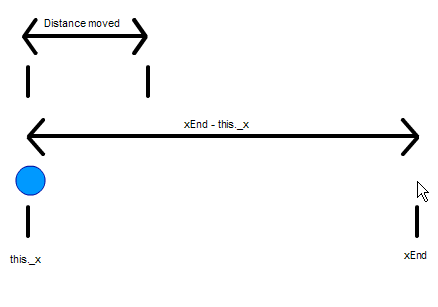
This uses some complicated maths, but is nothing new. It first make two values (yEnd and xEnd) equal to the x and y position of the mouse. These co-ordiantes are where the Movie Clip will end up. Hence the name. Then, it makes it so that every frame, the Movie Clip will get a third closer to the mouse, which is quite fast considering our frame rate is 30 fps. it does this by finding the movie cips x value, and adding on: the final x position subtract the ending x position divided by 3. And if this ends up as a minus number, then obviously, the Movie Clip would move backwards. This image should help you understand:
Then finally, it increases the timeon variable by 1 every frame, and when it equals 7, the Movie Clip is removed. So in other words, it is removed after 7 frames. This is to free up memory, as the Flash would freeze very quickly if there were thousands of duplicated Movie Clips all over the stage. Those of you who have been following these tutorials will realise that the first one won't be removed, but that it a minor concern.
Well, that's it, I hope you've learned something from this tutorial, and I hope you can find a way to use it in your own Flash work. Thank you for reading this,
Leon.