Main Content
The Timeline
Welcome back to Foundation Flash tutorials. This is the second in the series: The Timeline.
The time line looks like this:

The timeline is broken up into frames. Frames are just like pieces of paper that an old style animator would draw a picture on. He would draw one picture, then draw the same one, but slightly different, and then another slightly different, etc, etc. Then when he flicks through the pictures fast enough, it would look like they are moving. This is how frames work. Although, you don't have to draw in every frame... but I will go into that in a future tutorial.
To the left, you will see the layers section:
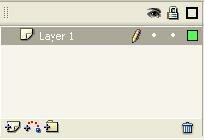
Layers work, well, just like layers in anything. Anything in layers on top would be shown above anything in layers below if they overlapped. It is wise to name these layers so you know which elements of your movie are in the layer.
At the bottom of the time line, you will see this:

From the left, they are:
- Current Frame
- Frame rate
- Elapsed time
The current frame is the frame you are currently in (obviously!).
The frame rate is measured in frames per second (fps), and is how many frames of your animation Flash will play through every second. For a general smooth animation, a frame rate of 30 fps is recommended. You can change this in the properties panel, next to where you could change the colour of the stage in the previous tutorial.
The elapsed time is how many seconds of your animation has passed.
Well that is it for the timeline, I hope that this has helped you and I hope you join me for my next tutorial.
Leon.