Main Content
Photoshop: Blending Options
Welcome to Foundation Flash's first Photoshop tutorial. In this tutorial, I will be teaching you about blending options, and introducing you to some of the basics of Photoshop. Better start by opening a new document, so open up Photoshop and go to File > New... A small dialog box should open up aksing for a name for your document. You don't have to call it anything, as when you press save later, It will ask what you want to save it as anyway. The default photoshop size is 454x340, but you can change that to something like 400x400. It will also ask you what you want the background contents to be. If you want a transparent image, it's best to change it to transparent, but if you want any background, leave it as Background colour, because you will then have a background layer to play about with. For the purposes of this tutorial, leave it as background colour.
If you are using Photoshop CS3, you should notice the newly improved panels layout, with a single column tools panel on the left, and othe panels arranged on the right. You should have noticed a small white box open up, or maybe the whole screen is grey with a white square in the middle, I don't know how you have yours set up. The most important part of the Photoshop layout is the layers. The layers should look something like this at the moment:
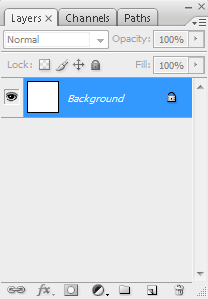
At the moment only the background layer is there, but If we draw anything on the canvas, another layer will be added, or we can add one manually using the new layer button. Layers in Photoshop work similar to layers in Flash, where if one layer is above another layer, it will cover that layer on the canvas.
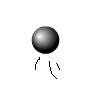
OK, onto blending options. Before we can use these, we need something to use them on. So choose the rectangle tool (it's not that hard to find) and draw a rectangle on the canvas. Hold down shift to make it a square. It should be black. You will notice that Photoshop has made a new layer called "Shape 1". We are now going to apply the blending options to our shape. This is where the fun begins.
Right click on the layer "Shape 1" and select Blending Options... A dialog box pops open with a load of confusing stuff. The important part is at the side. There is a column of options. Click on Gradient overlay to get started. This will add a gradient overlay to your shape. The default is black and white, but you can customise it however you like. I went for a bluey gradient:

Next we are going to add a bevel to it. Click bevel and emboss. Try playing about with all the settings. This is what I went for:

Practice is the key, you'll get the hang of it. Finally, we are going to add a drop shadow. Click on drop shadow. Done! :) You can play around with the settings if you like, but the default are fine. Once done, press OK, and you should see your effects listed below the layer. A tip, don't add too many effects, It makes your image look tacky and cheap.
There is just one last thing we need to do, you may have noticed a funny looking line around your square, the last thing we need to do is get rid of thatm so right click your layer, and select "Rasterize layer". All done. You should end up with something like this:

Thank you for reading this, join me next time, where we will be exploring blending options in more detail,
Leon