Main Content
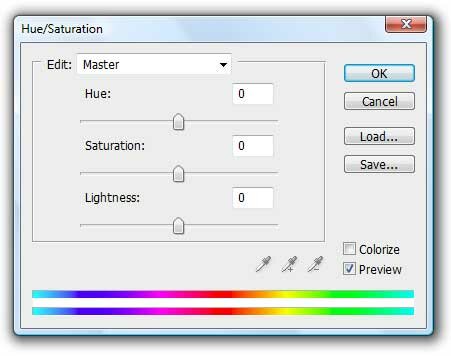
Understanding the Hue/Saturation Dialogue
In Photoshop you have the ability to enhance, or simply change, the colour, lightness (or brightness) and the saturation (the amount of colour) of any pixel on the screen. That may be a given, but normally there is more than one way to accomplish something on a program and Photoshop is no exception. Let's say you wanted to tweak the balance of a photo you took on holiday - this can be achieved through changing the levels of the photo, playing around with curves or using the Hue/Saturation dialogue. In the following tutorial we will be taking a look at Hue/Saturation(/Lightness) option.
Hue:
When you will open Hue/Saturation dialogue box the first thing your eye is likely is the top one of the three horizontal sliders: Hue. By changing the Hue value you will change the colour itself. Hue can be taken pretty much as a substitute for colour (or perhaps even tint) here.
Saturation:
Saturation is amount of colour applied. So by dragging to all the way to the left you will take out all colour and then the photo you have been working on, or a selected area of it, will come out in varying shades of grey. When you drag it toward the right, you increase amount of colour and making the photo appear more vivid/garish (as appropriate).
Lightness:
Using lightness you can change the brightness of colour through by dragging the slider bar. Towards the left lowers (i.e. darkens) this value; toward rights enlarges (i.e. whitens) it. It is not useless - it usually helps in achieving that specific colour in your mind.
Other options usually don't come in that much use, However they are worthy to be mentioned here anyway. Maybe they would benefit you in someway. The "Edit" dropdown near the top of the dialogue box (with options including some colour names) lets you choose specific a colour range to work with. So by choosing "Red" you can change only the Red elements of the photo's brightness, saturation or you can change the colour itself by changing the hue.
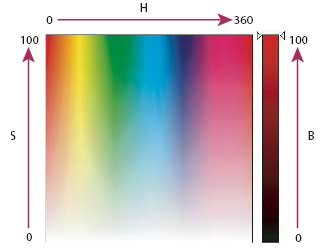
Concept
To understand more about colour range system and grasp the whole idea of Hue/Saturation concept you would like to take a look on the bottom picture. In which H represents hue, S represents saturation, and B represents brightness (or lightness in other words).
Accessing to Hue/Saturation
Now that you know how to use it, you might like to check it out and practice a bit, which is an good idea - practice makes perfect, after all, as you gain in experience. However, there is also more than one way to do this. Firstly, you can go to Image > Adjustment > Hue/Saturation, which will bring up the dialogue box for you, and will change the whole image. Or if you prefer, you can make a new adjustment layer, which will probably be a better way of doing it since your changes are wrapped up in a new layer and don't permanently change to real photo - you can always delete the layer later. Some times you'll be able to choose: either way you like it. By the way, you can do the latter by going to Layer > New Adjustment Layer > Hue/Saturation and there you have it. Same will happen if you click on this icon:
![]()
Itt's located at the bottom-right of the layers panel.
Hope this helped! Don't forget to come back for some new basic and cool free Photoshop tutorials.
Umer.