Main Content
File Menu
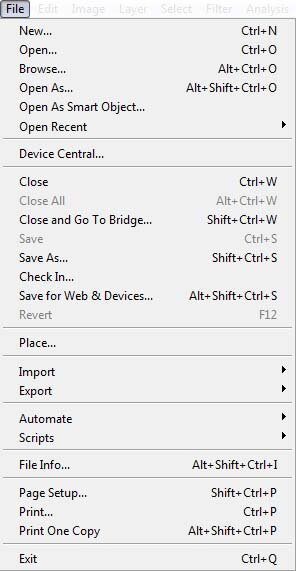
Welcome everyone to another one of Foundation Flash's free Photoshop tutorials. Today I will be going over File menu in Adobe Photoshop. Although the version of Photoshop we'll be looking at is CS3, which some of you might not have, there is no need to panic - most of the options will be available in CS4 and/or previous versions. This tutorial is a good starting point for beginners and of use to more advanced Photoshop users: there is always some stuff you should know but you never get a chance to find out. Today is the day you get to know everything that is there to know about File menu and many of those options will come in handy one day. Below is the illustration of File menu, take a brief look; we will be going over the options step by step.
New
Lets you create new file (duh). When you click on it a dialog box appears which shows the setting of new slide. You can change them to suit your purpose. Inside the dialog box there is a Preset-select menu that contains pre-made adjustments for certain needs. For example if you are going to design a web page, then you can choose a screen resolution for a web page and it will automatically adjust the settings for that.
Open
If you need to open a file to edit or just to have a look at, then you want this option (pretty obvious, right?). When you click on it, again, a dialogue box appears which let your locate and browse to the file you are after. In addition, you can choose the type of file you are finding, which can seriously help when you have dozens of files of many different types and want to open only certain kind of file. For example, if you're looking for a jpg file, filtering for jpgs will make your search easier, by showing you couple of files not hundreds.
Browse
This is best suited to pictures. It shows files in thumbnails rather than as usual icons which the open option shows. So basically a same thing, but with a much better capability to explore and see detailed information about images.
Open As
Open As lets you open a file as some other filetype. As we saw with the open menu we can choose the type of file we want to open. But with Open as we can choose that what type that file should open as. e.g. If I had Photoshop's format of file which is filename.psd, and I wanted to open it as filename.jpg file, I would use the Open as option.
Open As Smart Object
Smart objects were only introduced in Photoshop CS3, and are designed to make image reusable. You can transform them, resize them or whatever, but they will always be a reference to another file, so if you edit that file (e.g. a logo) all instances of that object are updated.
Open Recent
This is a helpful option - it lets you quickly find and open files which have recently been used. When you hover your mouse over it shows you a list of files which you have recently modified, saved or opened. The list can be cleared by clicking on the 'Clear recent' option under the list.
Device Central
It provides a convenient way of creating content for other devices besides computer e.g. mobile devices. Through this option you can choose a device you want to work for and it will automatically create a new file with a suitable height, width, resolution and color which fit with that device.
Close
Close simply allows you to close the file you are currently working on, without closing other files inside Photoshop or Photoshop itself.
Close All
Close all closes all the files open in Photoshop.
Close And Go to Bridge
This is same as first closing your file and then loading Adobe Bridge (a media organiser that ship with Adobe products). Just a shortcut, really.
Save
Allows you to save a file, just like in every single other design-based program. A dialogue box appears asking for a file name and a location, if file is new; else Photoshop just saves the changes in the file. The Format-select menu in the dialogue box lets you choose the format of file you want to save a file as.
Save As:
Mostly the same as Save. Just allows the saving of a file with a different name / file extension extension (format, like jpg), so the original is not overwritten, but preserved.
Check In
For most user the same as Save as, so no point in wasting time on it. (If you were the sort of person that would utilise its functionality, you'd know immediately what it was, anyway.)
Save for Web devices
This is a very useful option, especially for web designers (and Flash developers!). It serve two main function: the co-ordination of slices, and the optimisation of files. Using the dialogue, you can choose quality levels, size, formats and a myriad of other options (or just go with the defaults). A logo might warrant higher quality; a small icon probably a lower quality. This lets the user minimise the size of your images without compromising overall quality (well, that's the idea, anyway!).
In Photoshop you can create slices. If everything in your file was lumped together in one picture, a slices / save for web combo would let you choose the specific regions and save them separately with different modifications. For example if I created a layout for a website then after I have finished I could draw slices, i.e. boxes, around the logo, the background pattern and other stuff, and then tweak the qualities for each independently, as above.
Place
Place lets you place (drop) something into the opened file, instead of opening it in separate window then copy-pasting.
File Info
If you wish to set an author name and description about the file, which can be read without opening it, then File info is the option you are looking for. I personally use it rarely but this is probably just a bad habit - I should really be more kind to my computer / clients / colleagues.
Page Setup
Page Setup is about choosing how your content should print. e.g. landscape or portrait; the size of the paper you're using.
Simple as it sounds, Print is used when you need to print something in Photoshop. Gives you quite a lot control over the printing, when compared to other programs, I think.
Exit
When you are finished with your work and want to close Photoshop than you would either go toward top right and click on cross sign to close the program or Click on File> Exit.
That's it, I'm afraid. Some of the options I haven't touched on because they really have very few uses that are especially suitable for beginners. There will be more tutorials so don't forget to check back. Also, don't forget to use the shortcut key combinations which are written next to the menu options. You can look them up in the picture at the top of this tutorial.
Umer.